

A visit is one walk through the property. The first visit records the condition from scratch; later visits compare against it. This page is the first visit. The words used for "visit", "room" and "item" come from the template, so a commercial schedule says "inspection", "area" and "element" where a residential inventory says "visit", "room" and "item".
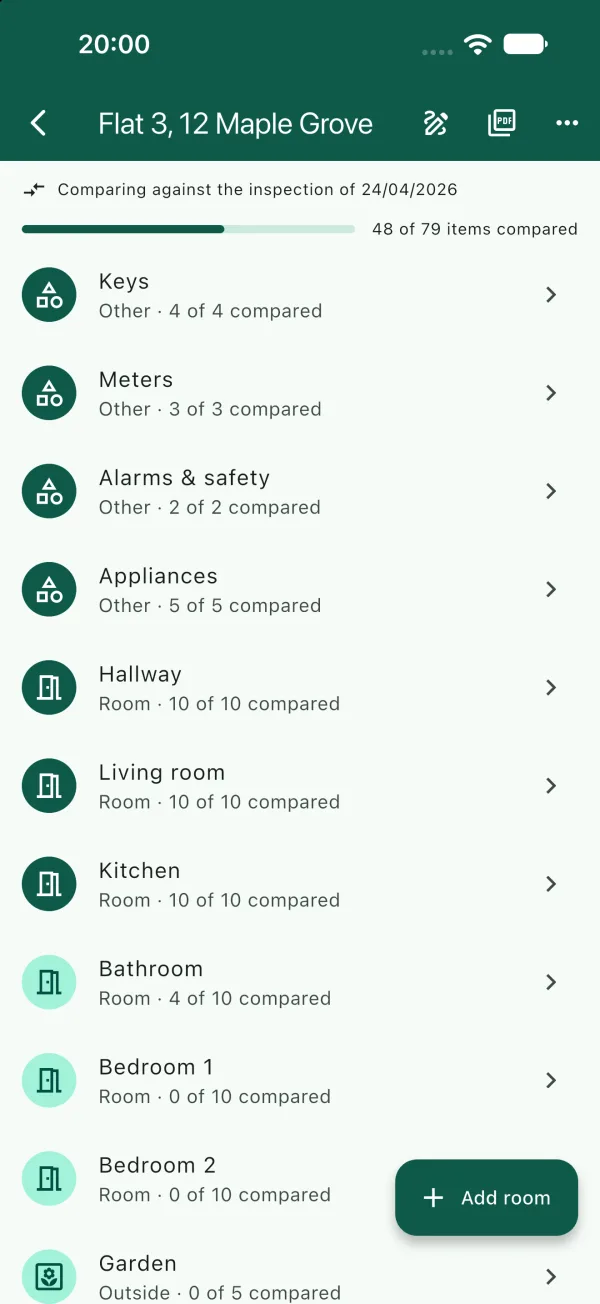
Start the first visit
- Open the property and tap New visit.
- Choose the first option, New visit (baseline), described as "Record the condition from scratch".
- The walk opens: a list of the property's areas, in the order the template set.
Nothing is saved until you grade something, and everything you do grade is saved as you go. You can leave and come back at any time.
Areas
An area is a room, an elevation or an outside space. Each row shows how many of its elements you have inspected.
- Add one: tap Add room (or "Add area") at the bottom and give it a name. It goes at the end of the list.
- Rename or hide one: open the area and use its menu. Hide from this property keeps it out of this and every later visit and report; a hidden area can be shown again from the same menu.
- Delete one: from the same menu. Its elements go with it.
Elements
Tap an area to see its elements: walls, ceiling, floor covering, windows and so on. Until you grade an element its row says Not inspected, and the report prints it that way rather than leaving it out. Add item adds an element the template did not expect, for example a built-in wardrobe.
Tap an element to open it. The arrows at the top right move to the previous or next element without going back to the list, so you can walk a room in one pass.
Grades
Tap a grade to record it. The grades are the template's: Excellent, Good, Fair and Poor on a residential inventory, Good, Fair, Poor and Defective on a commercial schedule, Sound, Hairline, Cracked and Damaged on a party wall record. A residential inventory also asks for cleanliness: Professionally cleaned, Clean, Fair or Dirty.
Every grade has a one-line definition, and the report prints a key with those definitions, so a reader never has to guess what "Fair" meant.
Photos
- Tap Photo to open the camera. Take as many as you need; the camera stays on this element until you leave it.
- Tap Library to add a photo you took earlier instead.
- Tap a photo to add a Caption, mark it up with Annotate, or delete it. Scale reference marks a photo with a rule or coin in shot, which the report highlights.
Each photo keeps the time your camera recorded, and the report prints it under the photo. A library photo with no time in its metadata is flagged. See Capture times.
Description and measurements
Description is free text: what the element is made of and what you can see. "Emulsion, light scuffing behind the door; otherwise sound" is the kind of line that makes a later comparison easy.
Under Measurements, tap Add measurement, say what it is (width, length, crack width) and type the value. Measurements print with the element.
Custom fields
Some elements carry extra fields from the template. On a residential inventory, keys ask for a count, meters for a reading, and alarms whether they were tested. They appear on the element screen below the grade and print in their own section of the report. If you copy a template you can add your own fields; see Your own templates.
Visit details
From the walk's menu choose Visit details to record who was Present (one per line, with the role in brackets), the Purpose and the Weather. They print on the cover.
Finish the visit
- Check the walk for anything still marked "Not inspected". It is fine to leave an element uninspected if you could not get to it; the report says so.
- From the walk's menu choose Mark visit complete.
- Take signatures if the counterparty is with you, or send a signing link. See Signing.
- Preview or export the report. See Reports and exports.